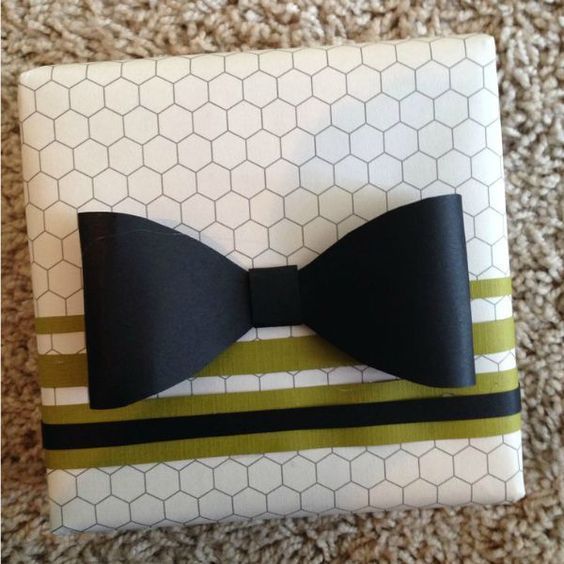
How to Make Adorably Cute Paper Ribbons That Are Perfect for Petite Gifts and Place Cards – Super Easy!
2016.11.28 published
I want to give a cute wrapped petit gift ♡
Have you decided what to give as a petit gift? ♡ The good thing about petit gifts is that, unlike wedding favors or sweets, you can see the guests' reactions directly ♡ I want them to say “So cute! ♡” when I give it to them and get excited ♩
Here’s a DIY idea using paper ribbons that I want to mimic at my wedding*
However, the average price for a petit gift is about 200 to 500 yen each. I want to make it cute, but I can't spend that much on wrapping.
This time, I will introduce a DIY idea for [paper ribbons] that can be easily made without spending money, while ensuring that the wrapping will definitely be cute!*
[Paper ribbons] are, as the name suggests, ribbons made of paper ♡ Their three-dimensional look is super cute, and it makes you want to decorate all sorts of items with them ♩
How to make paper ribbons ① What you need to make [paper ribbons] ♡
The only material needed for [paper ribbons] is [colored paper].
All you need are scissors, writing tools, tape, and other supplies. Many pre-brides probably already have everything at home without needing to go shopping!
Brides who say “I don’t have colored paper!” can buy a set of 10 colors for under 500 yen on Rakuten ♩
➡ Buy colored paper on Rakuten*
How to make paper ribbons ② Cut the colored paper into the shape of the template ♡
Once you have the colored paper in your favorite color, print out the template below and cut along the lines.
Place the cut template on top of the colored paper, lightly trace the lines with a pencil, and then cut along those lines with scissors.
You can make two [paper ribbons] from this template*
When you finish cutting the colored paper according to the template, you will end up with these three parts.
How to make paper ribbons ③ Assemble the parts together ♡
Finally, assemble the parts to create a three-dimensional structure.
For the largest part in the center, gather the ends towards the constricted part in the middle and secure them with tape.
If you cut the tape lengthwise with scissors to make it thinner before using it, it will stick more neatly*
Once the largest part is created, place the second largest part on top. Wrap the smallest part around the center and secure it from behind with tape!
It has taken the shape of a ribbon ♡ And that's it♩ It’s super easy, right?*
Decoration ideas for [paper ribbons] ①♡
When attached to a common craft bag, it looks like a cute bow tie ♡
By placing two strips of masking tape vertically, it can look like a boy with suspenders ♡
Decoration ideas for [paper ribbons] ②♡
If you make it using only the largest and smallest parts, it will look like this. It's very simple and stylish, isn’t it?*
I want to decorate a small box-type petit gift with it ♡
Decoration ideas for [paper ribbons] ③♡
By using colored paper with cute patterns, you can create such adorable wrapping ♡
It would also look absolutely cute if you attach it to a place card or photo prop…!!!
I introduced the method to make super cute [paper ribbons] that are easy to make ♡
What did you think? ♡
With just three very simple steps to make [paper ribbons], have fun trying out different arrangements while creating them!*


![marry[マリー]](https://imgs.marry-xoxo.com/assets/marry_logo-e3a503203d635925f956631f4df079fe97f587ed360274455ead4fe26052b631.png)
 結婚式DIY
 ペーパーアイテム
 通販
通販
 ウェディングアイテム
 コラム
コラム
 ウェディングケーキ
 お金・節約
お金・節約
 髪型・メイク
 ドレス
ドレス
 和装
和装
 前撮り・ウェディングフォト
 靴・アクセサリー
 ブーケ
ブーケ
 挙式
挙式
 披露宴
披露宴
 ウェルカムスペース・装花
 引き出物・ギフト
 BGM・ムービー
 二次会
二次会
 ラブラブ結婚生活
 プロポーズ
プロポーズ
 顔合わせ・結納
 入籍
入籍
 式場探し
式場探し
 ハネムーン
ハネムーン
 ネイルアート
 指輪
指輪
 美容
美容
 新郎
新郎
 両家家族(親族)
 ゲスト
ゲスト
 韓国風
韓国風


